

 Español
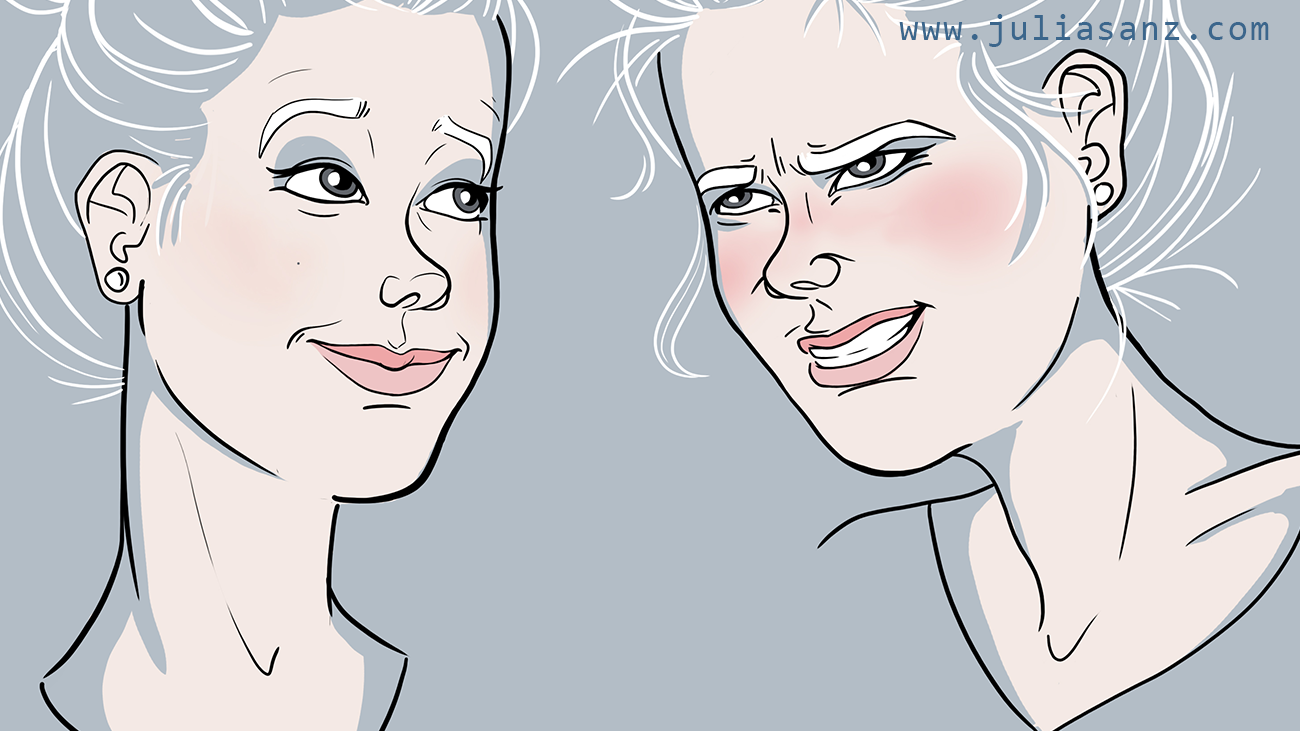
Some tips on character design.
From the initial layout to the presentation.
Character design offers an endless range of possibilities when facing the blank paper. The type of project and who commissioned it are key features that will set the frontiers of our imagination when deciding how to design a character. In any case, however, our creation should be inspiring and have a life of its own, avoiding a sense of indifference. It should be able to foster our curiosity.
The process of character design is critical in the pre-production stages of every project (animation, video game, comic, etc.). It is essential when we want the spectators to empathise with the characters, plot and emotional burden carried by our story. Otherwise, dullness might well bring disaster to the project.
From the conception of our idea or the reception of a briefing, to the moment in which our protagonist becomes real, a number of intermediate steps should be taken into account. Following these steps will help us to keep our work organized during the character design process.
When talking about creativity, there is no such thing as an absolute truth and we all have our working style. However, I’d like to give you some tips that might help you to avoid going crazy and annoyingly backwards during the process. Let’s start!
1. The audience
Depending on the audience to whom the project is directed, characters will vary on their complexity and expressiveness. For example, when projected to children, shapes and colours used to design the characters should be simple, as children don’t have the necessary cognition to identify more complex ones. We will be able to increase the realism and complexity of our characters when so does the age of our audience.
2. Type of project: animation vs. publishing
If the project is aimed for an animation studio so that our work will be included in a production chain, we must ensure that our character can be effectively modelled and animated by others. This standard should be applied when talking about either 3D or 2D character design and about digital or traditional techniques. For instance, a 3D modeller might not have extensive drawing skills and their work could be based on a given plane of the character provided by us. This is why the design must be precise, understandable and detailed enough so that we do not leave anything to the imagination.
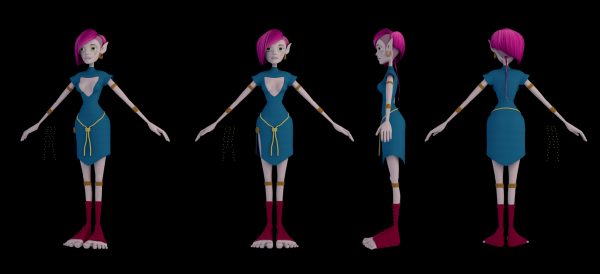
–3D Nymph. By Alvar Guisado–
On the contrary, given an illustrated album for children or a comic, options about drawing style and anatomy of the character will considerably widen. In these cases, as characters will not be animated, some limitations might be ignored. Indeed, there is no need to pay that much attention to aspects like the file size, concept definition, complexity of clothes and accessories or how would the animation be.

–Children illustration for “El Convivenciario. Cuentos con valor“. By Julia Sanz–
Not taking into account some technical aspects from the beginning appears to be a common error. As a result, we may need to jump into a previous step on the process, redesigning or adjusting details that the animator did not found enough clear from the beginning.
3. The briefing
It might seem pointless to remember this, but it is never enough to say that a careful reading of the briefing is critical. Sometimes, our imagination goes wild and important details might be missed. This is why it is always convenient to have the briefing at reach and do some review from time to time, so that we keep focused on our tasks. In this regard, you may find useful to underline key words and characteristics as well as to ask for additional details to complete the description if necessary.
4. Paper scratching
It is expected that we search for some image references in order to study similar characters that may already exist. However, it might be useful to do a previous abstraction exercise while drawing freely, always trying to keep our mind clear. This is a way to avoid “polluting” our inspiration with other’s work, as if we start by searching for references, we might end up finding a picture that sticks to the brain, completely blocking our imagination.
5. References
Haste makes waste, especially when referring to the first steps in a project. Beginnings are usually difficult, as we face the blank paper while trying to cope with the pressure of deadlines. Well, do not panic. It is always better to go step by step than scrapping a great deal of work because of the rush. In this regard, I’d like to emphasize that it is better to lose (better said invest) two or three hours searching for references than going straight away without a plan. The better we get informed, the more credible our character will be.
6. Analysing other characters
It is convenient to monitor creations of other designers to know why some characters are successful while others do not have the same impact on the audience. This is a good way to avoid basic mistakes and to rule out some initial options. It’d be also worthy to conduct a study on the existing creations to avoid mainstream tendencies and seek originality.
7. Construction and characterization
Once the previously mentioned steps are completed, we are ready for the next phase: giving life to our character. It is important that our ideas are defined by now and the possibilities to achieve them should be narrowed to a few ones.
It is the ability of a character to be expressive what makes it complex, not the amount of elements that comprise it. In fact, when talking about complexity, less is often more. It is a good idea to have a try for different accessories and expressions, while tending to make them simpler. Though additional elements can be included whenever is necessary, our character should keep a strong basis.
8. Versions
Constructing a variety of versions about our character is a convenient way to both explore and discard new options and possibilities. The more time we spend thinking about it, the more things will come across to our mind in order to make our character unique.


It is important to show our client more than one version of our character, so that they get a real impression of the work done as well as a better understanding of the project. Though our character should express by itself, adding these versions to perform a complete presentation is always a good choice.
9. Character study
Once the design and characterization processes are set, it is time for a test. In this regard, even if we are designing a 2D character, it should be able to move in every direction. Drawing planes from different views in which is called a“turn around”is a good way to check how our character works. Front, ¾, side and back views are usually sufficient for this purpose.

–Character study. Motion. By Julia Sanz–

-Turn around. By Julia Sanz-

-Turn around. By Julia Sanz-
We could then try to move it, testing how its anatomy performs. It is important to understand that not every character will move in the same way, so we might have to consider different postures related to our character’s nature. Ideally, its movements will tend to be more emphatic than in real life, so that the character becomes highly expressive, thus making its own personality visible with just a glimpse.
IMPORTANT: hands are usually a challenge, but they possess an immense expressive content… Do not hide them behind the character!
10. Face expressions
A study on face gestures and expressions might be conducted in parallel to the study on motion previously mentioned, focusing on those that reveal the most of our character’s personality. These gestures might as well be exaggerated. In this aspect, eyes will show a great importance, as they tend to be the face elements which best transmit our character’s emotions and feelings.
However, eyes will not do the work only by themselves. The look of our character needs to be complemented with the face expression, comprising a complete mechanism to express a particular mood. Some key face elements are eyebrows, eyelids, forehead, nose, lips, jaw and cheeks.

11. Coulor
The colour scheme used will depend on the type of character we are designing. As previously mentioned, children do not perceive tertiary colours and this is why we should use mainly the primaries when working on a project for the youngest.
Colouring is a useful tool when giving identity to our character, and also helps to emphasize its personality. At this point, it is important that we keep in mind the concept of colour psychology and feelings linked to each of them. For instance, orange is the most lightweight colour, commonly associated to feelings like happiness, vitality and joy. It might well be one of the best options for dynamic and cheerful characters. On the contrary, most of Disney’s villains are coloured in black, violet and purple tones, which usually give them an aura of might and mystery.
Generally speaking, we will always seek intentionality and harmony when choosing a colour scheme. The addition of unnecessary colours will only overload our character, distracting and vanishing its essence. If we stick to a good scheme choice, the use of complementary tones can be useful to highlight determined elements with which our character could interact or that form part of it.
12. Details
Details will always enrich the design as they add extra information. However, they should be only added when the character already has a strong basis. No matter the number of details present in the clothes or its hair. If the character lacks of a properly built anatomy, it will not work.
13. The presentation
This is it! Now that all is set, the only thing to do is to organize everything on a sheet, in order to present our character. It is important to include all the elements associated to it, such as the most characteristic postures and face expressions linked to its personality.
We should try to avoid loading the sheet with too much information. Most of times it is better to include just a few well-chosen elements that fit with our character’s nature and maybe add some clarifying text. Generally, I would recommend including the following elements:
– Character in the centre of the sheet with a posture that defines its personality.
– Face expressions (between 3 and 5).
– Motion study (2 postures).
A turn around sheet should be included if our character is intended for 3D modelling. In this sheet we might include the previously mentioned front, ¾, side and back views, indicating on them each part of our character’s anatomy.
Well, I believe this is all I wanted to share with you by now! I really hope you find this point-by-point summary useful and it helps you to organize when starting a new character design project. Whether you have a new commissioned project, are creating new material for your portfolio or just want to enjoy freeing your imagination, creativity comes only from you!
Monica Guimaraes
Monday May 4th, 2020 , 11:09 AM
Julia Sanz
Friday September 18th, 2020 , 09:55 PM
Leave a comment